Wiki » History » Revision 23
« Previous |
Revision 23/43
(diff)
| Next »
Tomek Dziemidowicz, 2019-07-04 08:38 PM
SQLite-sync documentation
Owner : AMPLIFIER sp. z o.o.
Contact : support (at) ampliapps.com
website : https://ampliapps.com
- Table of contents
- SQLite-sync documentation
Welcome to the AMPLI-SYNC documentation!
We have language bindings in JavaScript, .NET C#, Java and Objective-C!
AMPLI-SYNC concept
Solution diagram

- Devices communicate with server using HTTP/HTTPS protocol.
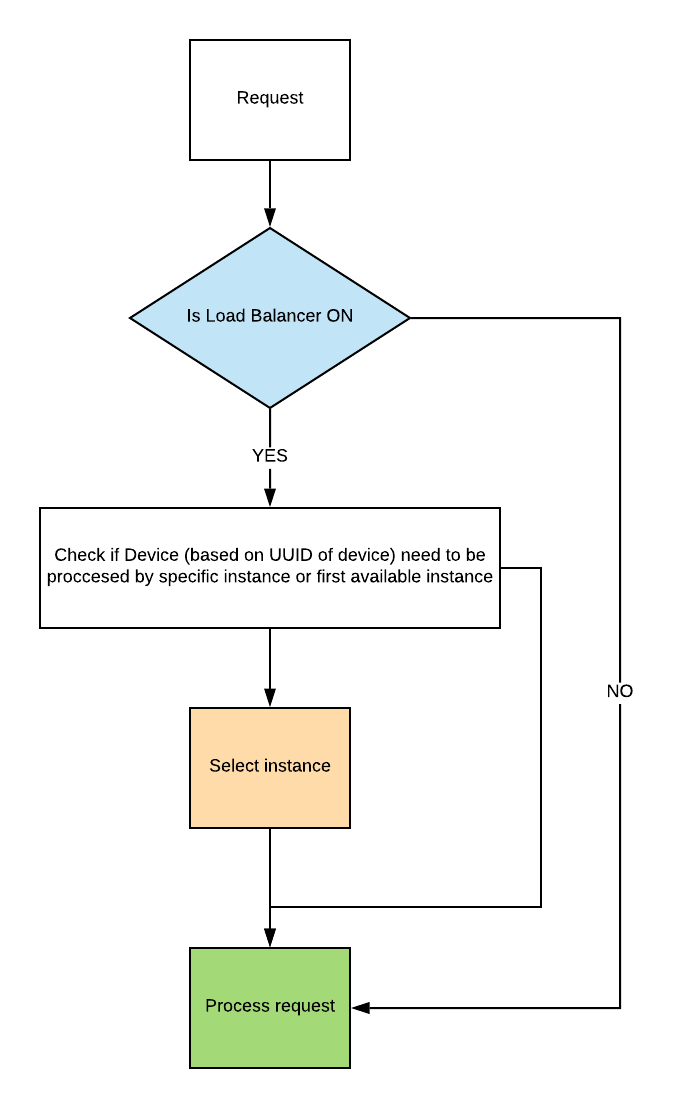
- Proxy Load Balancer. If necessary, proxy can redirect request to another instance of SQLite-core.
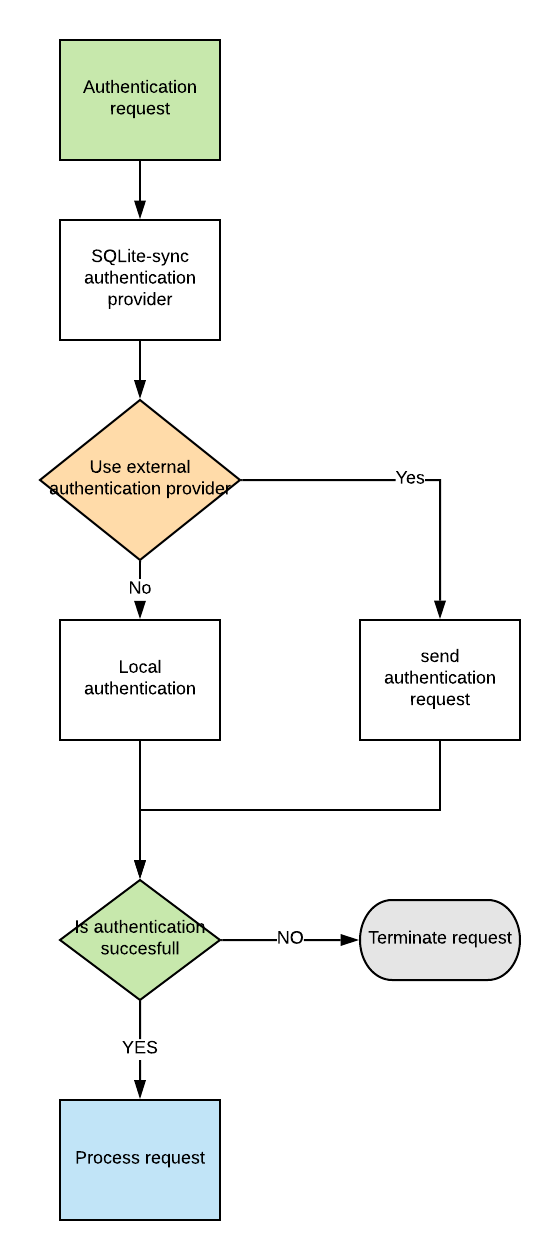
- Authorization provider will generate token based on response from authorization provider.
Proxy Balancer flowchart
Authorization Provider flowchart
REST API (server API)
Protocol version
This document describes integration with the REST API 3.x protocol.
Service description
There are two stages to processing a request:
- Device places an request.
- SQLite-sync server confirms the request has been processed successfully and sends confirmation with eventual conflict list that need to be resolved.
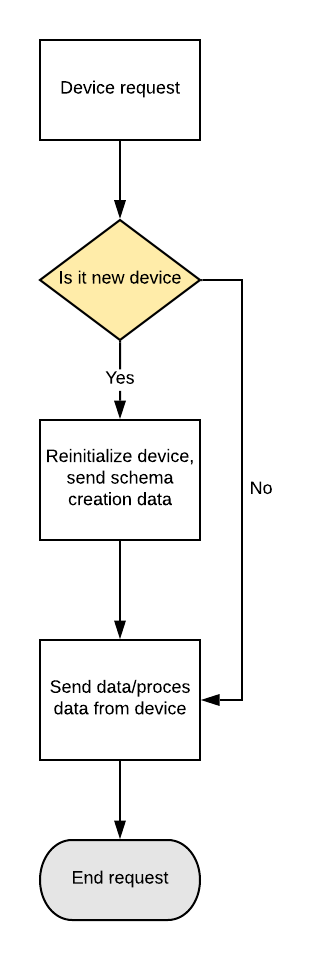
Synchronization flowchart
Request URL format
Sample REST API call:
https://example.com/API3/__method___
Explanation:
https://example.com/ - adres of REST API service
API3 - version of synchronization
method_ - method/action
Conflict Resolution
Update procedure
Data filtering
Installation
Server Prerequisites
To make ampli-sync server work you need:- Apache Tomcat 8.
- Java
- Linux/Windows environment.
Manual
Steps needed to install AMPLI-SYNC manually on Ubuntu.
- Install Tomcat on Ubuntu:
https://www.digitalocean.com/community/tutorials/how-to-install-apache-tomcat-8-on-ubuntu-16-04 - Create new user
sudo adduser amplisync
System will ask you for password for newly created user. - Add user to group ‘tomcat’
sudo usermod -a -G tomcat amplisync
- Chang in web.xml path variable to
\home/sqlitesync/demo
- Install new application in Tomcat. Start with switching to amplisync user.
su amplisync
- Create new folder /home/sqlitesync/demo
- Upload new service amplisync-demo to Tomcat. You can do that using Tomcat application manager, or you can put WAR file in Tomcat webapps folder. Name of your WAR file is app name in Tomcat environment. Remember to not place spaces and special chars in name of your WAR file.
- Restart Tomcat:
service tomcat restart
Now you can access your installation using link:http://your_ip:8080/amplisync-app-name/API3
- Setup permissions:
chown -R sqlitesync:tomcat /home/amplisync/demo/
Docker
Configuring AMPLI-SYNC service
First you need to adjust website configuration file (web.xml), then you need to change main configuration file (sync.properties).Service configuration (web.xml)
Go to your_webapps_folder/SqliteSync/WEB-INF/web.xml and open for edit. Navigate to section:
<env-entry>
<env-entry-name>working-dir</env-entry-name>
<env-entry-type>java.lang.String</env-entry-type>
<env-entry-value>/your/working/dir/sqlite-sync/</env-entry-value>
</env-entry>
change env-entry-value key and point to working dir where SQLite-sync.com server will store log files, temporary files and configuration. Create manually a subfolder named config. Create a text file sync.properties in folder config. The path should look like this:
\working_dir\config\sync.properties
IMPORTANT Restart service after changing web.xml. Make sure that Tomcat has read/write access to working dir.
Sample configurations for MySQL server
DB_ENGINE = mysql
DBURL = jdbc:mysql://server:3306/dbname?rewriteBatchedStatements=true
DBUSER = user
DBPASS = pass
DBDRIVER = com.mysql.cj.jdbc.Driver
DATE_FORMAT = yyyy-MM-dd HH:mm:ss
HISTORY_DAYS = 7
LOG_LEVEL = 4
If you faced a timezone error after configuration in `sync.properties` add at the end of connection string:
&useUnicode=true&useJDBCCompliantTimezoneShift=true&useLegacyDatetimeCode=false&serverTimezone=UTC
Keys explanation
DB_ENGINE - type of database engine. Available options:
- mysql
- mssql
- postgresql
- oracle
LOG_LEVEL - defain details level for log
4: TRACE, DEBUG, INFO, WARN; (default)
3: DEBUG, INFO, WARN;
2: INFO,WARN;
1: WARN;
0 - disable logs
DATE_FORMAT - set format of date
default format: yyyy-MM-dd HH:mm:ss
HISTORY_DAYS - How long files with sync data will be kept
default value: 7
When you use MySQL database DO NOT remove from the end of the connection string:
?rewriteBatchedStatements=true
Supported databases
Samples
Updated by Tomek Dziemidowicz over 6 years ago · 23 revisions
Go to top