SQLite-sync documentation
Owner : AMPLIFIER sp. z o.o.
Contact : support (at) ampliapps.com
website : https://ampliapps.com
- Table of contents
- SQLite-sync documentation
Welcome to the AMPLI-SYNC documentation!
We have language bindings in JavaScript, .NET C#, Java and Objective-C!
AMPLI-SYNC concept
Solution diagram

- Devices communicate with server using HTTP/HTTPS protocol.
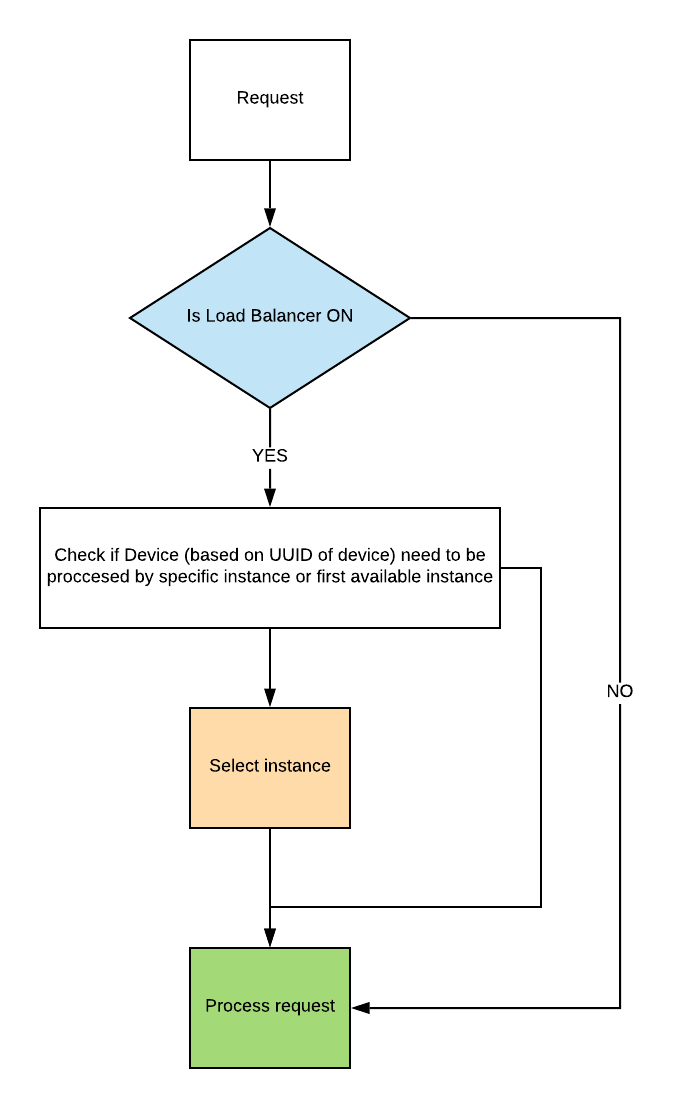
- Proxy Load Balancer. If necessary, proxy can redirect request to another instance of SQLite-core.
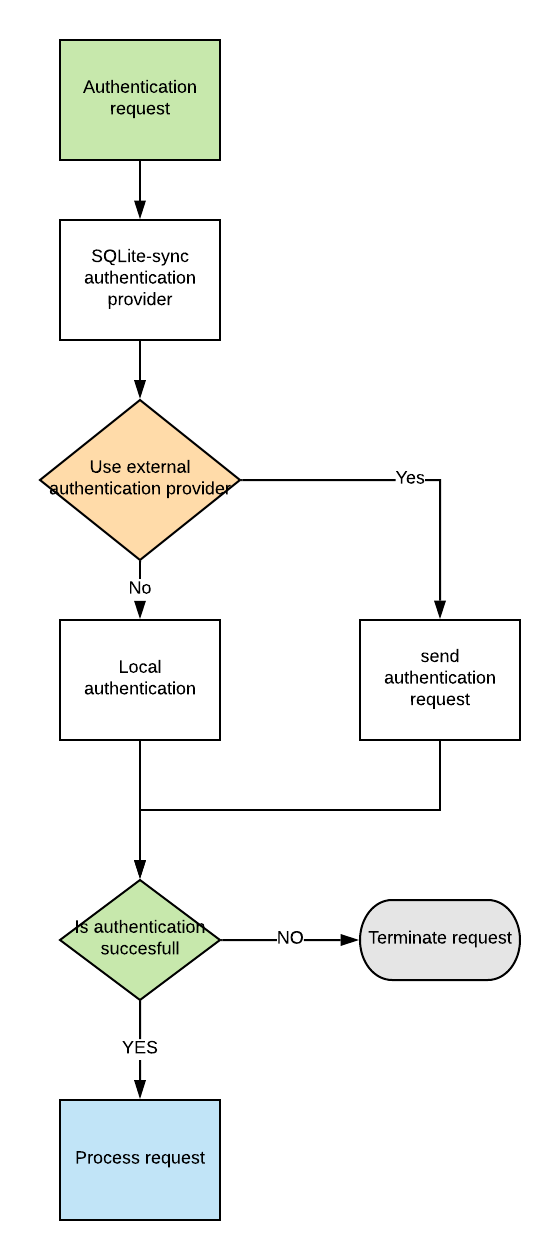
- Authorization provider will generate token based on response from authorization provider.
Proxy Balancer flowchart
Authorization Provider flowchart
REST API (server API)
Protocol version
This document describes integration with the REST API 3.x protocol.
Service description
There are two stages to processing a request:
- Device places an request.
- SQLite-sync server confirms the request has been processed successfully and sends confirmation with eventual conflict list that need to be resolved.
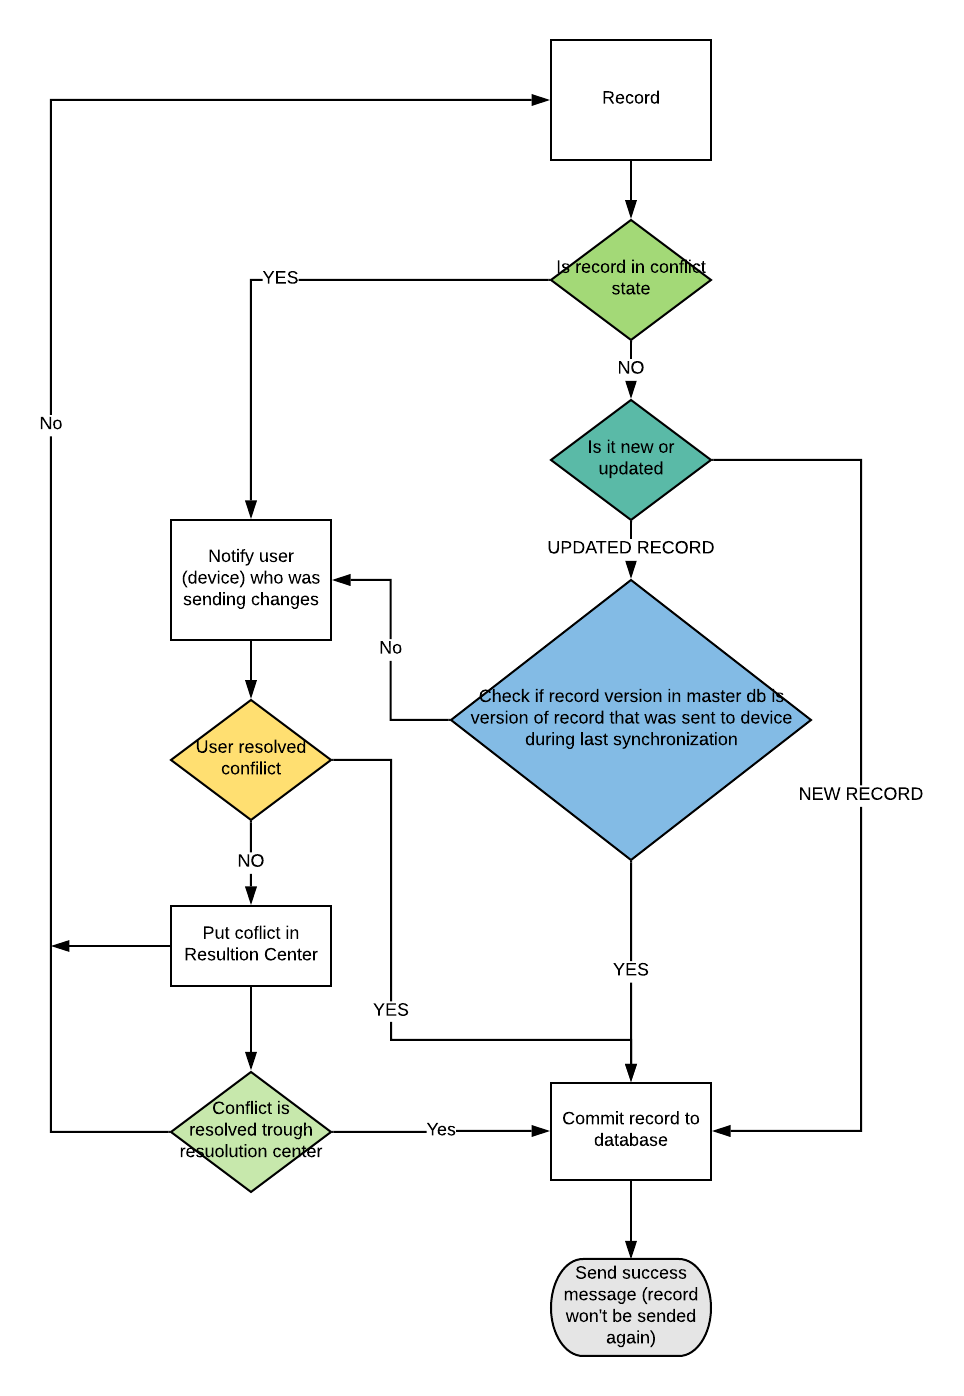
Synchronization flowchart
Request URL format
Sample REST API call:
https://example.com/API3/__method___
Explanation:
https://example.com/ - adres of REST API service
API3 - version of synchronization
method_ - method/action
API methods
API3 - control method
Method : GET
Path : “/API3”
Produces : TEXT_HTML
Description : control method. Returns “API[v3] SQLite-Sync.COM is working correctly!” if web service is correctly configured.
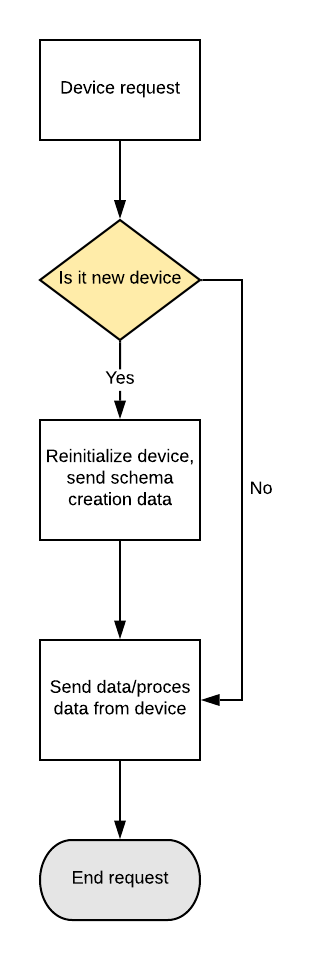
InitializeSubscriber - Reinitialize subscriber
Method : GET
Path : “/InitializeSubscriber/{subscriberUUID}”
Produces : TEXT_PLAIN
Description : Reinitialize subscriber, create empty schema on device, prepare master database for new subscriber.
- InitializeSubscriber Objective-C
- InitializeSubscriber .NET C#
- InitializeSubscriber JAVA
- InitializeSubscriber JavaScript
Sync - gets changes for table
Method : GET
Path : /Sync/{subscriberUUID}/{tableName}
Produces : TEXT_PLAIN
Description : Get changed data.
Params:
subscriberUUID - identifier of subscriber. By default device unique ID is used. But we can place there any value (also #user.UUID)
tableName - name of table from database (without schema)
Response:
<?xml version="1.0" encoding="utf-8"?>
<records>
  <r a="1">
    <c>2</c>
    <c>Document</c>
    <c>75541</c>
    <c>2014-02-13 00:00:00</c>
    <c>665.000</c>
    <c>2c93d64e-cc72-11e3-87e0-f82fa8e587f9</c>
  </r>
  <r a="2">
    <c>4</c>
    <c>Document 4</c>
    <c>4879</c>
    <c>2014-04-23 13:44:48</c>
    <c>4875.000</c>
    <c>2c93d765-cc72-11e3-87e0-f82fa8e587f9</c>
  </r>
</records>
<records> - section contains records
<r a=”1”> - here starts record.
</r> - here record ends
Attribute “a” (action type)
1 - new record
2 - update for record Implementation examples:
CommitSync - control method
Method : GET
Path : “/CommitSync/{syncId}”
Produces : TEXT_PLAIN
Description : If device recieved all changes without error this method should be call to tell server that there was no errors during receiving package. Params: syncId - id of data package
Send - control method
Method : POST
Path : “/Send”
Consumes : JSON
Produces : TEXT_PLAIN
Description : Send changes from device to master database.
For sample data format with changes see XML code sample.
Implementation examples:AddTable - control method
Method : GET
Path : “/AddTable/{tableName}”
Produces : TEXT_PLAIN
Description : Add table to synchronization.
RemoveTable - control method
Method : GET
Path: “/RemoveTable/{tableName}”
Produces : TEXT_PLAIN
Description : Remove table from synchronization.
Conflict Resolution
Update procedure
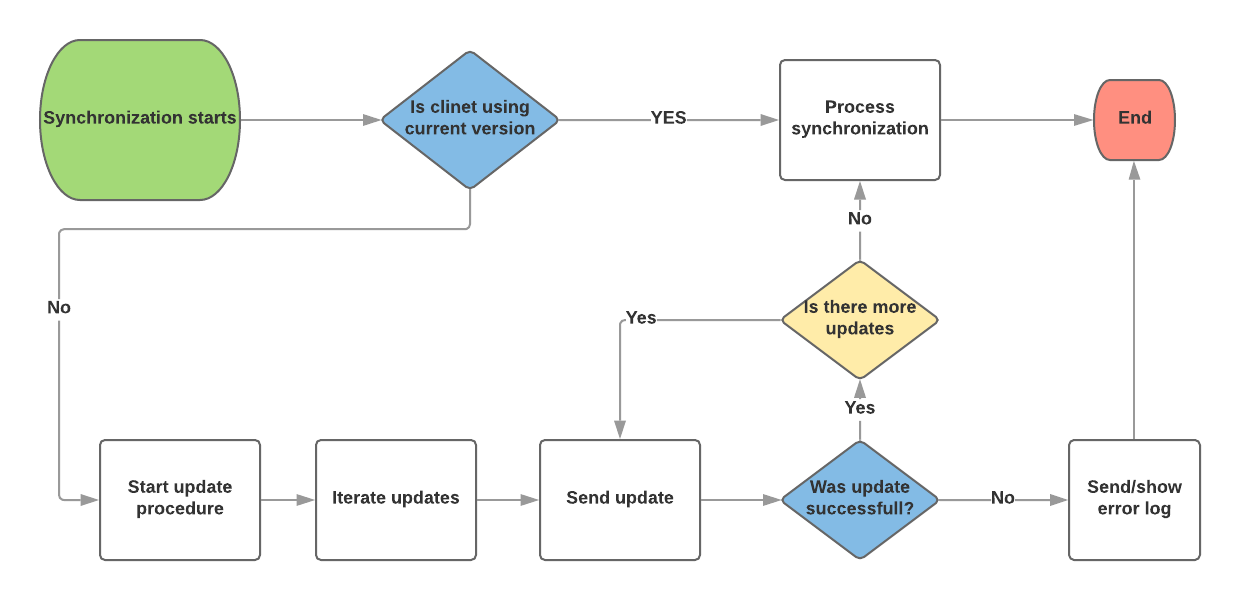
When the user first starts the client application, will be forced to go online and do an initial sync with the master DB, which sends a schema used to create the local database and its tables. After that, the user can work offline.
When user is in older version will be forced to make update of schema. All updates will be sent to client and apply locally. After successfully update client will send unsync data to master database.
A schema update usually means an update of the application is also needed, since the application will need different SQL code to deal with the new schema.
The master DB will never receive changes from clients with the old schema, since a client always pulls before pushing changes - and in the pull it would have received and applied the new schema.
Data filtering
Goal : send to device only documents that are main.
We will going to use the device with subscriber id 1.
In the database we have a table where we are storing documents .[Documents] , user data .[Users] and table with relations between documents and users .[UserDocuments].
[dbo].[Documents] structure: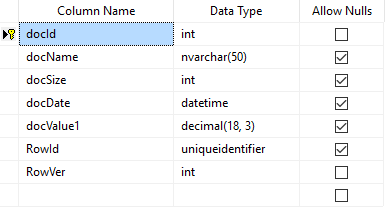
[dbo].[Users] structure: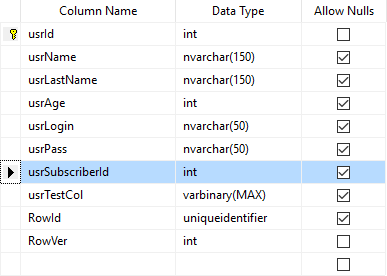
[dbo].[UserDocuments] structure:
Please notice, that in table dbo.User we have a column usrSubscriberId - it tells exactly which user uses particular subscriber id. Based on this column we are able to select which user id is used while the device is undergoing the synchronization process.
The next step is to prepare view: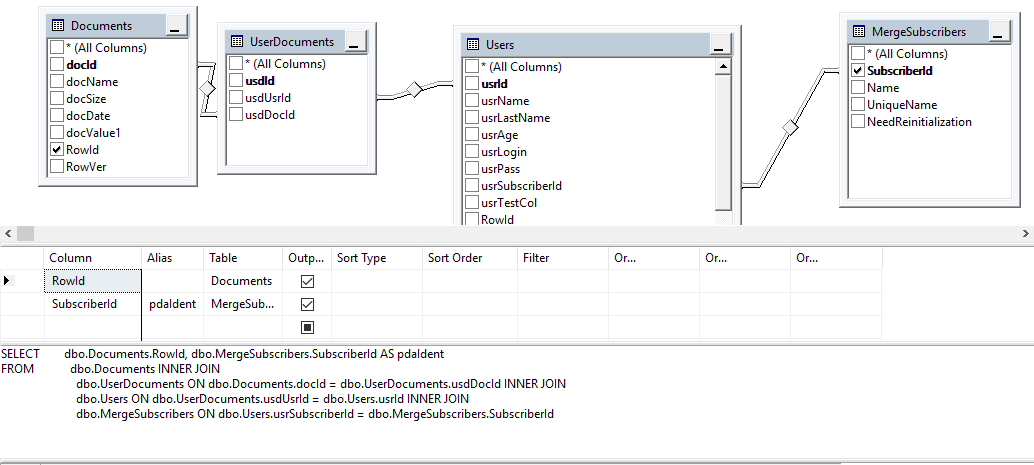
SQL code:
SELECT dbo.Documents.RowId, dbo.MergeSubscribers.SubscriberId AS pdaIdent
FROM dbo.Documents
INNER JOIN dbo.UserDocuments ON dbo.Documents.docId = dbo.UserDocuments.usdDocId
INNER JOIN dbo.Users ON dbo.UserDocuments.usdUsrId = dbo.Users.usrId
INNER JOIN dbo.MergeSubscribers ON dbo.Users.usrSubscriberId = dbo.MergeSubscribers.SubscriberId
- RowId of filtered table (dbo.Documents is this scenario) subscriberId aliased as 'pdaIdent’
- You can add extra condition in this view - it’s up to you.
Next step, we need to tell synchronization to use that filter:
update [MergeTablesToSync] set TableFilter='vwMerge_Documents' where TableName='Documents' and TableSchema='dbo'
where vwMerge_Documents is the name of your view.
Installation
Server Prerequisites
To make ampli-sync server work you need:- Apache Tomcat 8.
- Java
- Linux/Windows environment.
Manual
Steps needed to install AMPLI-SYNC manually on Ubuntu.
- Install Tomcat on Ubuntu:
https://www.digitalocean.com/community/tutorials/how-to-install-apache-tomcat-8-on-ubuntu-16-04 - Create new user
sudo adduser amplisync
System will ask you for password for newly created user. - Add user to group ‘tomcat’
sudo usermod -a -G tomcat amplisync
- Chang in web.xml path variable to
\home/sqlitesync/demo
- Install new application in Tomcat. Start with switching to amplisync user.
su amplisync
- Create new folder /home/sqlitesync/demo
- Upload new service amplisync-demo to Tomcat. You can do that using Tomcat application manager, or you can put WAR file in Tomcat webapps folder. Name of your WAR file is app name in Tomcat environment. Remember to not place spaces and special chars in name of your WAR file.
- Restart Tomcat:
service tomcat restart
Now you can access your installation using link:http://your_ip:8080/amplisync-app-name/API3
- Setup permissions:
chown -R sqlitesync:tomcat /home/amplisync/demo/
Docker
Configuring AMPLI-SYNC service
First you need to adjust website configuration file (web.xml), then you need to change main configuration file (sync.properties).Service configuration (web.xml)
Go to your_webapps_folder/SqliteSync/WEB-INF/web.xml and open for edit. Navigate to section:
<env-entry>
<env-entry-name>working-dir</env-entry-name>
<env-entry-type>java.lang.String</env-entry-type>
<env-entry-value>/your/working/dir/sqlite-sync/</env-entry-value>
</env-entry>
change env-entry-value key and point to working dir where SQLite-sync.com server will store log files, temporary files and configuration. Create manually a subfolder named config. Create a text file sync.properties in folder config. The path should look like this:
\working_dir\config\sync.properties
IMPORTANT Restart service after changing web.xml. Make sure that Tomcat has read/write access to working dir.
Sample configurations for MySQL server
DB_ENGINE = mysql
DBURL = jdbc:mysql://server:3306/dbname?rewriteBatchedStatements=true
DBUSER = user
DBPASS = pass
DBDRIVER = com.mysql.cj.jdbc.Driver
DATE_FORMAT = yyyy-MM-dd HH:mm:ss
TIMESTAMP_FORMAT = yyyy-MM-dd HH:mm:ssZ
HISTORY_DAYS = 7
LOG_LEVEL = 4
If you faced a timezone error after configuration in `sync.properties` add at the end of connection string:
&useUnicode=true&useJDBCCompliantTimezoneShift=true&useLegacyDatetimeCode=false&serverTimezone=UTC
Keys explanation
DB_ENGINE - type of database engine. Available options:
- mysql
- mssql
- postgresql
- oracle
LOG_LEVEL - defain details level for log
4: TRACE, DEBUG, INFO, WARN; (default)
3: DEBUG, INFO, WARN;
2: INFO,WARN;
1: WARN;
0 - disable logs
DATE_FORMAT, TIMESTAMP_FORMAT - set format of date
default format: yyyy-MM-dd HH:mm:ss
HISTORY_DAYS - How long files with sync data will be kept
default value: 7
When you use MySQL database DO NOT remove from the end of the connection string:
?rewriteBatchedStatements=true
Supported databases
AMPLI-SYNC supports those databases:
- MySQL
- Microsoft SQL Server (2005 and newer)
- Oracle
- PostgreSQL
Supported columns data types
SQLite-sync.com uses own conversion table to match column data types when schema from master database is converted to sqlite database.- blob
- longblob
- varbinary
- binary
- image
- mediumblob
- varbinarymax
- byte[]
- longtext
- varchar
- nvarchar
- char
- varcharmax
- enum
- mediumtext
- text
- string
- geography
- geometry
- hierarchyid
- nchar
- ntext
- nvarcharmax
- userdefineddatatype
- userdefinedtabletype
- userdefinedtype
- variant
- xml
- tinytext
- set
- time
- timestamp
- year
- datetime
- uniqueidentifier
- datetime2
- date
- mediumint
- bit
- tinyint
- smallint
- bigint
- int
- boolean
- byte
- long
- int64
- serial
- int32
- smalldatetime
- double
- float
- numeric
- decimal
- real
- money
Primary Key requirements
Single and mupltiple columns are supported as primary key.
When column is AUTO_INCREMENT/SERIAL, identity pool management is handled by AMPLI_SYNC. It means when you insert a new record onto the device, the PK will be automatically changed for the first value available for device.
Updated by Tomek Dziemidowicz about 6 years ago · 43 revisions
Go to top